
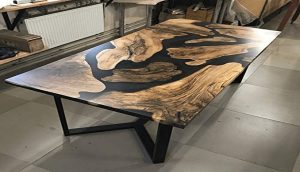
Making epoxy resin tables can be a rewarding experience. These are not something you can make in an instant, but the end result is worth it with beautiful and durable furniture that will last for years to come.
How Much Does It Cost To Make An Epoxy Table
Epoxy resin table prices vary depending on the size and shape of the top. Popular shapes include hexagons, octagons, circles, squares, rectangles, and triangles. Prices range from $350 to more than $900 for a 36-inch round or square table with no design inlay.
Table of Contents
- How Much Does It Cost To Make An Epoxy Table
- How Do You Make An Epoxy Resin Table At Home
- What Do I Need To Make A Resin Table
- Is It Hard To Make An Epoxy Resin Table
- Why Are Epoxy Tables So Expensive
- How Do You Seal Wood Before Epoxy
- How many epoxies Do I Need For A Tabletop
- How Much Does A Resin Table Cost
- What Does Resin Not Stick To
- How Do I Make My Resin Table Top Clear
- How To Use Epoxy Resin On Wood
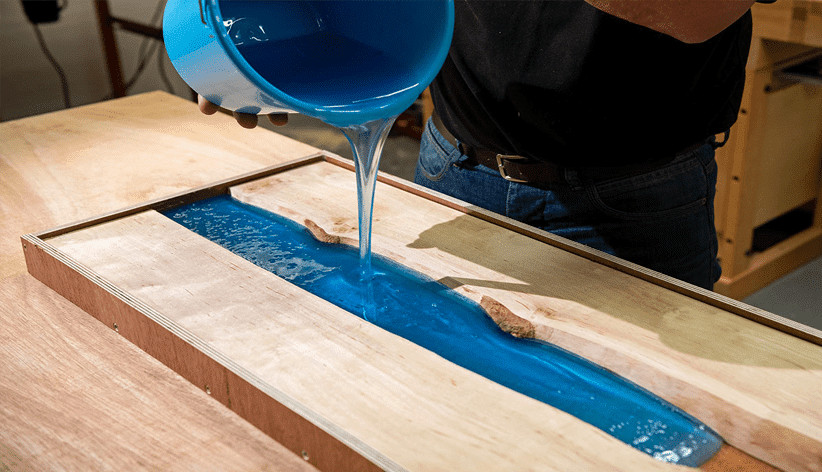
How Do You Make An Epoxy Resin Table At Home

An epoxy resin table is made by using a wooden base and clear varnish. This will be similar to making an outdoor coffee table, but instead, you’ll use the form of your choice for the top.
There are many forms available today that can give you different shapes or designs in order to suit any need (oval, square, rectangle).
Once you choose one, it will take several days until they build up enough strength before placing anything on them because their adhesive properties increase with time.
The best way would be to let these harden overnight after doing all the work when hopefully there isn’t anyone around who could mess them up-which still hasn’t stopped me from ruining my own projects!
What Do I Need To Make A Resin Table
First, you will need a tabletop that is in good condition. Any type of wood can be used, but we recommend using pine because it sands easily and does not warp as much as other types of wood.
You will also need to make sure the sanding sealer or primer has been applied evenly over the entire surface. If it is not, the resin will show through.
Next, you need to figure out how much resin and hardener you are going to use for your tabletop. When using epoxy resin, always fill in the area that needs coating before adding any of the mixed ingredients.
For example, if there are large cracks or gaps, they should be filled with wood filler first so when you pour in the resin mixture it does not seep under your tape line.
Also, try to avoid getting bubbles in your mixture because this could cause problems later on down the road when pouring or brushing over them without popping them beforehand.
If some do get missed by accident though don’t worry about trying to pop all of them after applying because once dry most will disappear on their own.
You will need to mix the resin and hardener together so they are ready for pouring onto your tabletop once all of these steps have been completed.
Make sure you do not leave any air bubbles by stirring up the mixture with a pop stick until it is completely smooth, then pour some into another container just in case there are more that might get missed before applying it to the entire surface area.
For this step, we recommend using disposable containers because clean-up can be difficult if you don’t use something like newspaper or paper towels underneath them when working on projects like this one since epoxy resin is very sticky after mixing.
Is It Hard To Make An Epoxy Resin Table

Not at all!
It is a fairly simple process of mixing the resin and hardener together, pouring it onto your tabletop, then letting it dry.
However, you must make sure to apply an even amount on both sides of your tabletop, or else any areas that are not coated completely will show through from one side once they have been flipped over again.
For example: if there was more resin applied to the bottom than what made it up to the top portion when laying them down flat after flipping them back over again, only those parts with excess coating would be visible, compared to those without enough left on their topsides, which could result in uneven lines along each edge as well as noticeable bubbles throughout some spots depending upon how many slip through the cracks while applying.
The best way to avoid these types of problems from occurring is by properly preparing your tabletop before coating it with anything, and following all of the instructions included in this article exactly as they are written, so you can have a beautifully finished epoxy resin table that will last for many years.
Why Are Epoxy Tables So Expensive

Epoxy tables are expensive because it takes a lot of time to make them. You have to mix all the materials together, which can take several hours or even days depending on how big your table is going to be.
Then you also need lots of different tools and equipment so that everything mixes well together without any problems at all. It’s definitely not easy!
However, if you’re looking for something truly unique in terms of design, then this may be exactly what you want to go with since they look fantastic in almost every setting imaginable.
How Do You Seal Wood Before Epoxy
Epoxy resin is a very versatile material that can bond together almost any surface.
It’s mostly used in industrial applications because of its toughness and ability to withstand heat, cold, UV light, chemicals, and more.
However, epoxy is also commonly found around the house for projects like patching holes in drywall or creating transparent waterproof coatings over surfaces such as glass.
How many epoxies Do I Need For A Tabletop
In general, you’ll need between three and four pounds of epoxy resin to make a tabletop. The amount will depend on the size of your tabletop.
There are two main ways to measure out how much epoxy material you’ll need: either by weight or volume.
Weight is usually more accurate than measuring in cups or gallons because it can be difficult to get an exact measurement with just a cup.
If you’re going for accuracy, use a digital scale that measures grams instead of ounces so that there’s no margin for error when using traditional measurements like teaspoons and tablespoons which aren’t as precise as grams.
In most cases, this won’t matter since one pound equals about 16 ounces.
How Much Does A Resin Table Cost
When you buy a resin table, the price usually varies depending on size and brand. People usually pay around $300-$700 for small tables that are between 24″ x 36″ to 48″. Larger sizes go up in price due to the cost of materials being used to construct them.
What Does Resin Not Stick To
Resin does not stick to any type of metal. No matter whether it is wood, stone, or ceramic, resin will create an incredible bond that lasts forever when applied correctly.
However, there are some materials the do not mix well with epoxy resins which you should avoid using together.
This includes polyester and nylon plastics because they have a chemical reaction between each other which causes the plastic material to warp over time making your project look bad.
How Do I Make My Resin Table Top Clear
Resin can be made clear with a few different methods. The main two are dyes and pigments.
Dyes will tint your resin, which you may or may not want depending on what project you’re making it for.
Pigments however will add some color to the mixture as well as make it completely translucent similar to stained glass! So if you’re trying to create a resin tabletop that is see-through this might just be your ticket!
How To Use Epoxy Resin On Wood
There are many ways to use epoxy resin on wood. You can make different projects by using epoxy resins, such as an outdoor table or boards for deck railing. If you want to know how to do it properly and easily.
Martin Flood
Martin Flood has been working in the construction industry for over 20 years as a general contractor with expertise in remodeling projects that are large or small. He has furthered his career by specializing in epoxy resin flooring, providing excellent service to both commercial and residential clients. Martin’s experience enables him to offer professional advice on how to choose the right type of project based on your needs and budget.
View all posts by Martin Flood →