

An epoxy table for beginners comes down to three habits: seal the wood before you pour, build a form the resin cannot escape, and pour thin layers instead of one deep flood. Get those right and the resin does most of the work for you. Get them wrong and you spend a weekend sanding a river of cured plastic off your garage floor.
A first pour can go wrong if the slab is damp, the form leaks, or epoxy is mixed in a cold shop in January and stays sticky. This guide walks through the order of operations a careful woodworker would use to build a table that looks like furniture.
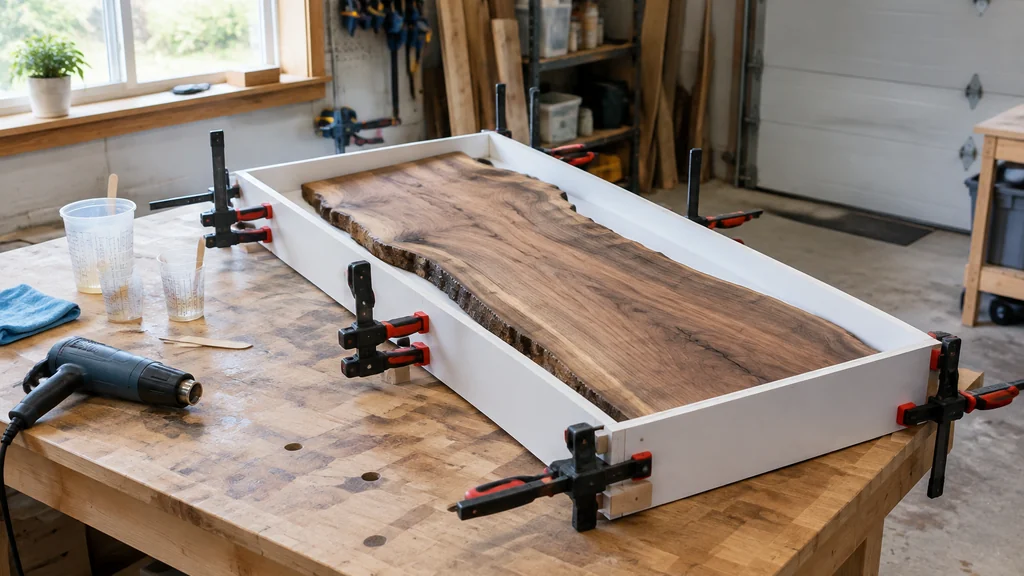
What you actually need before you pour
Start with the slab. Kiln-dried wood is the safe choice, and a moisture meter is worth borrowing before you commit. Resin over damp wood traps that moisture, and it will find a way out as bubbles or a cloudy patch months later. If the slab has bark, loose edges, or soft punk spots, stabilize or cut them back first.
Then gather the basics:
- Epoxy resin and hardener rated for deep pours, bought as a matched kit. Check the label for pour depth per layer and mix ratio.
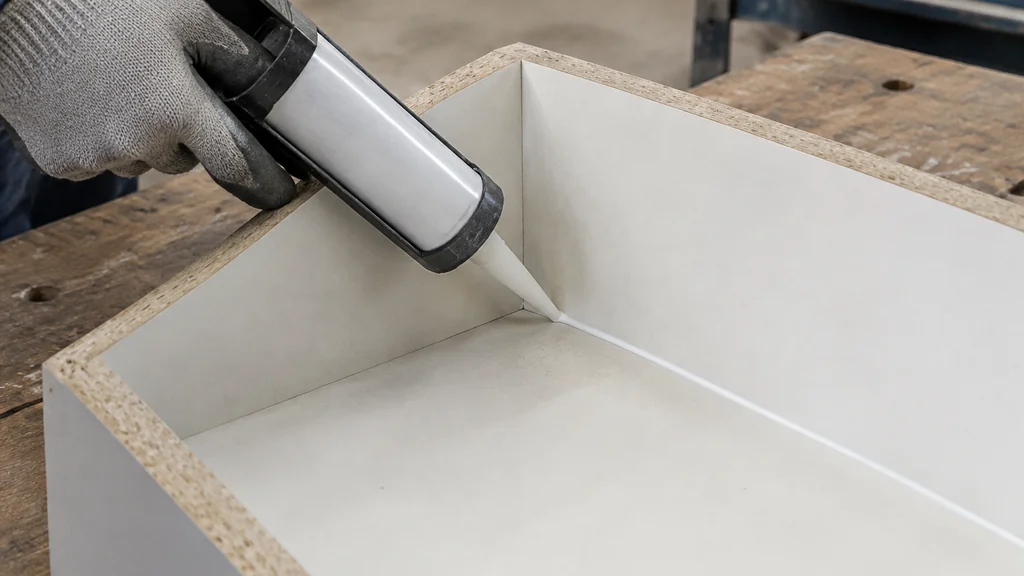
- A form of Melamine or sealed MDF, screwed together and lined with Silicone caulk at the seams.
- A level and shims. A table pour follows gravity, so a form that is off-level gives you a wedge-shaped tabletop.
- Mixing cups, stir sticks, and a digital scale if your kit is measured by weight.
- A heat gun or torch for popping surface bubbles.
- Nitrile gloves, a respirator, and eye protection. Follow the label for ventilation.
Use a digital scale if your kit is measured by weight, and follow the label’s mixing instructions.
Table of Contents
Sealing the wood is the step beginners skip
Raw wood drinks resin. If you pour straight onto an unsealed slab, the wood soaks up epoxy unevenly, air escapes from the grain for hours, and you get a rash of tiny bubbles under the surface. Seal the slab first with a thin coat of Epoxy Resin itself, or with a sanding sealer the resin maker approves. Let it cure, then scuff it lightly.
This is also where you decide how the wood and resin will read together. A clear pour over a figured slab shows every swirl. If you want color, Mica Powder is the beginner-friendly choice because it mixes smoothly and hides small flaws, and the ratios matter more than most people expect. My guide to mica powder ratios and their effects in epoxy covers how much to add before the resin turns muddy or the cure slows down.
Building a form that will not leak
Screw the form walls together from the outside so no screw heads sit inside the pour area. Run a bead of silicone along every inside seam and let it cure fully before the pour. Wrap the inside faces with a release agent or use melamine, which releases cleanly once cured.
Set the form on a level surface and check it in both directions with a spirit level. Shim until it reads true. Then tape the outside seams as a second line of defense, because a slow leak under a form is easier to catch on tape than on a concrete floor.
Give yourself a margin. The form should be a little larger than the finished top so you can trim and flatten the edges after curing. A table trimmed square on a tablesaw looks intentional. A table poured exactly to size looks like it was guessed at.
The pour, step by step
Work in a warm room. Most resins want a shop above the temperature on the label, and a cold garage slows the cure and traps bubbles. Read your kit’s instructions and follow them over anything you read online, including this.
- Level and re-check the form. Confirm it is still true after sealing and taping.
- Mix the resin and hardener by weight or volume exactly as the label states. Scrape the sides and bottom of the cup as you stir, and stir slowly to limit bubbles.
- Pour a thin seal coat over the wood and let it cure if you have not already done this.
- Pour the first working layer slowly, letting it spread on its own. A steady stream from low height creates fewer bubbles than a dump from high up.
- Pass a heat gun quickly over the surface to pop bubbles. Keep it moving so you do not scorch the resin.
- Let each layer cure to the stage the label allows before adding the next. Deep pours in one shot risk overheating and cracking.
- Cover the form with a box or plastic tent to keep dust off while it cures.
For a smaller round object, the same sealing and layering logic applies. The repair notes in this piece on bowling ball repair with epoxy show how curved surfaces behave differently from a flat slab.
Flattening, sanding, and finishing
Once the resin is fully cured, pull the form and trim the edges. If the top is not flat, flatten it with a router sled or a hand plane used carefully, then sand through progressively finer grits. Resin clogs paper fast, so change sheets often and keep the surface wet or dust-controlled.
Finish with a clear topcoat if you want UV resistance and a uniform sheen. Epoxy alone can yellow over time in strong sun, so a table near a window benefits from a finish made for that job. For a deeper look at how resin behaves on different wood species and how to handle the seal coat, see this guide on using epoxy resin on wood.
What it costs and where beginners overspend
A first table rarely costs what people expect because the mistakes add up. Budget for the resin kit, the slab, form material, mixing supplies, and sanding paper, and check current prices locally since they move. The biggest hidden cost is wasted resin from a failed mix or a leak, so buy a little extra and store it flat and dry.
Ways to keep the budget sane:
- Start with a smaller table or a side table for your first pour.
- Use a locally sourced slab instead of a premium figured one.
- Buy one good mixing scale and reuse your cups and sticks where the label allows.
- Practice the mix ratio on a small test pour before the real thing.
Mistakes that ruin a first table
A form that is not level gives a lopsided top. An unsealed slab gives bubbles and a dull patch. A cold shop can leave a tacky surface. Mixing by eye can give soft spots that stay gummy in the middle. Pouring too deep at once risks heat and cracks.
One more: rushing the sanding. Resin scratches show under a finish, and a table sanded only to a rough grit looks cloudy no matter how good the pour was. Take the extra passes.

When to call a pro
Call a professional if your slab is large, heavily figured, or has deep cracks that need structural stabilization. Deep pours on big tops carry real heat risk, and a pro has the equipment to control it. Also call one if the wood is antique, veneered, or has sentimental value, because a failed pour is hard to undo. For anything structural, check the label and your local rules before you commit.
Epoxy Table for Beginners FAQ
How thick should my first pour be?
Follow the maximum layer depth on your resin label, which varies by product. Beginners do best with thinner layers built up over several sessions. Check the spec sheet for your kit to find the maximum layer depth.
Why is my epoxy still sticky after a day?
Usually the mix ratio was off, the room was too cold, or the resin and hardener were not stirred fully. Scrape the sides and bottom of the cup as you mix, and work in a warm shop. If it stays tacky, the label usually tells you whether a re-coat can save it.
Can I pour epoxy over a damp or green slab?
No. Moisture under cured resin causes cloudiness, bubbles, and poor adhesion. Use kiln-dried wood and check it with a moisture meter before you seal and pour.
Do I need a pressure pot or vacuum chamber?
Most flat table pours do not need one. A heat gun or torch handles surface bubbles, and sealing the wood first prevents most of the bubbles that come from the grain. Save the pressure pot for casting small pieces.
How long before I can use the table?
Wait for the full cure time stated on your product label, even if the surface feels hard. Sanding and finishing come first, and a finish needs its own cure time. Rushing this step is how a good pour gets ruined at the end.

Martin Flood
Martin Flood has been working in the construction industry for over 20 years as a general contractor with expertise in remodeling projects that are large or small. He has furthered his career by specializing in epoxy resin flooring, providing excellent service to both commercial and residential clients. Martin’s experience enables him to offer professional advice on how to choose the right type of project based on your needs and budget.
View all posts by Martin Flood →