

Many people have a desire to create their own epoxy resin table, but don’t know how to go about it.
In this blog post, we will give you step-by-step instructions on how to make your very own round mold for epoxy resin tables.
How Do You Make A Round Mold For An Epoxy Resin Table
You will need:
- a round object that is the size you want your table to be (I used a cake pan)
- masking tape
- duct tape
- epoxy resin (I used Envirotex Lite)
- a stirring stick
- wax paper or plastic wrap
- newspaper
Begin by taping the round object securely to a work surface. Tape around the edges of the object, making sure there are no gaps where epoxy could seep through. Make sure the object is well secured, as it will be difficult to remove later if it isn’t.
Next, cover the object with wax paper or plastic wrap. This will help keep the epoxy from sticking to the object. It’s also a good idea to cover the surface with newspaper, so there is no mess when you pour in your epoxy resin.
Table of Contents
- How Do You Make A Round Mold For An Epoxy Resin Table
- What Can Be Used As A Mold For Epoxy Resin
- How Do You Make Epoxy Molds
- How Do You Make A Cylindrical Mold
- How Do You Make A Circle Mold
- How Do You Build A Round Resin Table
- Can You Make Your Own Resin Molds
- How Do You Make Resin Shapes
- What Materials Can You Use For Resin Molds
- How To Make An Epoxy Resin Mold
What Can Be Used As A Mold For Epoxy Resin
Epoxy resin can be poured into a mold made of silicone, rubber, or metal to create many interesting shapes.
If you have tools at home and want to make your own unique epoxy resin table – it’s not as hard as it seems! You don’t even need expensive kits with pre-made molds.
How Do You Make Epoxy Molds
There are a few ways to make epoxy molds, but we will be discussing how to make a round mold for an epoxy resin table. The supplies you need are:
- a bowl or another container that is at least the size of your desired tabletop
- masking tape
- duct tape
- PVA glue or wood glue
- clamps (optional)
- a piece of wood at least the size of your tabletop
How Do You Make A Cylindrical Mold

- Take a piece of cardboard and cut out a circular shape.
- Draw a line down the center of the circle and then draw another line dividing the circle into fourths.
- Cut along these lines to create four equal sections.
Next, take one of the sections and roll it up into a cylinder shape. Tape it in place so that it stays rolled up. Repeat this process for the other three sections. Now you should have four cylinders that are all connected together.
Now it’s time to make the mold base. Cut out a square piece of cardboard that is larger than your cylindrical mold. Glue or tape two of the cylinders (the end ones)
How Do You Make A Circle Mold
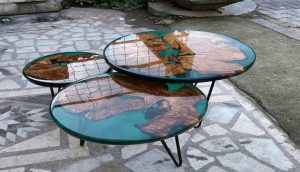
There are a few different ways to make a circular mold, but we will be using the method of making a form out of wood. This is a great way to get a nice, even curve for your tabletop.
You will need:
- piece of wood at least 24″x24″
- jigsaw or coping saw
- drill with a bit that is slightly smaller than the diameter you want your table top to be
- sandpaper (optional)
- epoxy resin and hardener
- tabletop finish (optional)
First, cut your piece of wood into a square. If you have access to a bandsaw, this would be the best tool to use to get a perfect square. If you don’t have a bandsaw, no worries! A jigsaw or coping saw will do the trick.
Next, use your drill to make a hole in the center of your square that is slightly smaller than the diameter of your tabletop.
Now it’s time to cut out the circle! Use your jigsaw or coping saw to carefully cut along the edge of the hole you drilled in the center of the square. Make sure to go slow and steady so you don’t damage your mold.
If you want, you can sand down any rough edges on your mold at this point.
Finally, pour some epoxy resin into your mold and let it cure according to the instructions on the resin you are using.
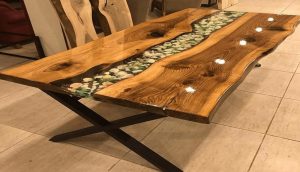
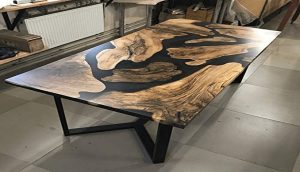
How Do You Build A Round Resin Table
A round resin table is a perfect addition to your backyard. The best part about building one yourself is that you can easily customize it to suit the exact look and design that you want for your outdoor setting.
There are several ways in which you can build a circular resin table, depending on what type of material you have available as well as how much time and effort you would like to put into this project.
Can You Make Your Own Resin Molds
You can easily create custom shapes and sizes using epoxy putty like Smart Detailing Products’ Slow Hardener Epoxy Putty.
This will not be an in-depth tutorial but rather show some examples of how to use it.
We hope that it gives you inspiration on what awesome creations you can do yourself!
How Do You Make Resin Shapes
There are a few ways to make resin shapes. You can pour the resin directly into the desired shape, use a silicone mold, or create a custom mold out of PVC pipe or other materials.
- To make the round mold, you will need:
- PVC pipe (the diameter of your desired tabletop)
- Tape measure
- Marker
- Circular saw
- Drill with hole saw attachment (or jigsaw)
- Ruler or straight edge
- Plywood scrap (at least as large as your PVC pipe)
- High density foam sheet (at least as
What Materials Can You Use For Resin Molds
There are many different materials you can use for resin molds. Some options include:
Rubber hose and plastic tubing
These items, when cut and fitted together in the shape of a round mold, create an inexpensive option that is easy to remove from your project once it’s been cast.
Just be sure not to choose rubber or vinyl that has been treated with sulfur-based chemicals as they will result in toxic fumes while curing!
GhostMold Silicone Mold Making Kit (Amazon):
The kit includes everything needed for creating eight silicone molds up to 12″ wide by 18″ long including two base plates, mixing cups for each part A & B, measuring cup(s), catchers/containers for excess material, and a stirring stick.
Silicone baking molds
These are great for detailed shapes and can be found in most craft stores. Just be sure to use food grade silicone so that your finished project is safe to eat from!
Dap 00755 Kitchen & Bath 100% Silicone Sealant, Clear (Home Depot):
This clear sealant is perfect for creating custom silicone molds of any shape or size! It cures in 30 minutes and is dishwasher safe after curing.
Plaster of Paris
This material can be used to create both simple and complex mold designs, but it does require a little more time to set than other materials. Once it has hardened, the plaster can be easily removed from your project.
Laticrete 264 Premium Grade White Masonry Waterproofing Membrane (Home Depot.
This durable, waterproof membrane is perfect for creating custom molds that are resistant to moisture.
It can be used on floors or walls and it adheres to many surfaces including concrete, wood, metal, glass, etc.
How To Make An Epoxy Resin Mold
This is a simple and easy way to create a round mold that will be the perfect size for your tabletop.
You will need:
- Two pieces of wood measuring 18″x18″ square
- A drill or jigsaw
Martin Flood
Martin Flood has been working in the construction industry for over 20 years as a general contractor with expertise in remodeling projects that are large or small. He has furthered his career by specializing in epoxy resin flooring, providing excellent service to both commercial and residential clients. Martin’s experience enables him to offer professional advice on how to choose the right type of project based on your needs and budget.
View all posts by Martin Flood →