
Filling gaps, holes, and cracks in wood is a common DIY task that can be accomplished using wood filler. This can be done by hand or with the help of a tool.
The type of filler you use will determine how easy it is to apply and how long it takes to dry. DAP premium wood filler is great for small projects like fixing small dings or scratches on your furniture.
However, if you’re working on larger projects such as replacing trim boards or repairing floorboards, then it’s best to use an exterior grade glue-based filler like PL Premium Bonding Wood Filler because it’s stronger than other types of fillers.
How long does it take for DAP premium wood filler to dry?
DAP Premium Wood Filler is best applied to a surface that is dry and free of dust. It can be used on interior or exterior wood surfaces, but it is not recommended for use on oiled or painted surfaces.
The drying time will depend on the temperature and humidity in your area.
It typically takes between 30 minutes to 1 hour for DAP Premium Wood Filler to become tacky; however, if you’re working in a very humid environment this may take longer (up to around 4 hours).
Once it’s tacky, you should wait at least 24 hours before sanding or painting over the area where you’ve filled any holes or cracks with DAP Premium Wood Filler.
Table of Contents
- How long does it take for DAP premium wood filler to dry?
- How do you use DAP filler?
- How do you use a wood filler?
- Is DAP premium wood filler Sandable?
- Does DAP wood filler crack?
- How long do you let wood filler dry before sanding?
- How do you use wood filler for large gaps?
- Can you paint over DAP wood filler?
How do you use DAP filler?
When it comes to using this product, there are a few things you should know.
- You can apply the filler with your fingers, but it’s much easier if you use a putty knife or even a paint roller. The reason for this is that the filler will get on your hands and any other tools that come into contact with it.
- Be sure to get all of the gaps filled in so that no wood is exposed when it dries.
How do you use a wood filler?
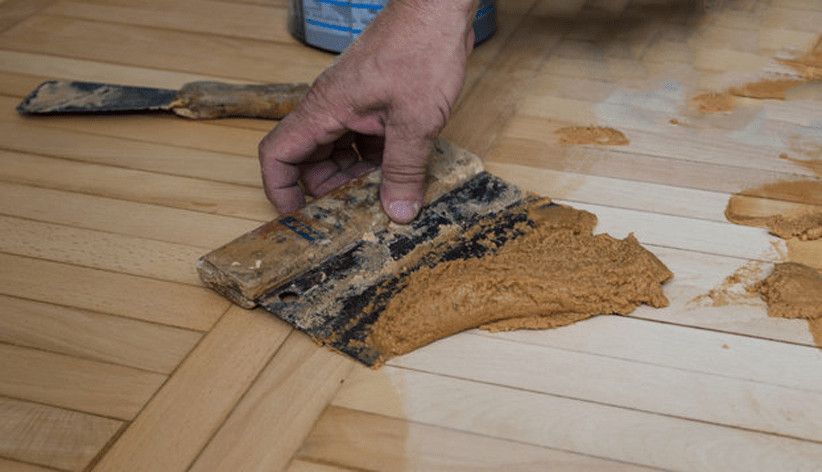
First, you should smooth the surface with a putty knife to ensure an even application. A quick way to do this is by laying the tip of your knife on top of the wood filler, then pushing it down and rolling it off in one direction (be careful not to dig too hard!).
This isn’t strictly necessary, especially if your wood filler has some texture or color already built into it—but it does help ensure uniform coverage when smoothing out bumps.
Next up: Letting the wood filler dry before sanding. This is probably what you want to do anyway as a safety precaution for yourself and others who might come in contact with your project!
To speed things along, place something overtop of the area where you applied your wood filler that will keep air from getting at it (a piece of cardboard works well).
And is there any chance that cats could get into contact with wet filler? That’s when you’ll want to move those cats out of harm’s way until their paws are ready for action again!
Is DAP premium wood filler Sandable?
Yes, DAP premium wood filler is sandable. Sanding the filler will make it smoother and help you avoid rough spots that show through after painting.
To sand your project:
- Be sure to use fine grit sandpaper (150 or 220)
- Use a block to get an even edge on both sides of the board
- You may have to go over your project several times in order to achieve an even finish
Does DAP wood filler crack?
You can avoid cracking by following the directions above. If you do end up with cracks, you can use a putty knife to remove as much filler as possible before sanding.
A wide knife will help reduce the chance of gouging into the wood and causing more damage. Once all of the filler has been removed, give it a few coats of primer and paint (depending on your project) before starting again.
How long do you let wood filler dry before sanding?
Once the filler has cured, it’s ready to sand. We recommend using fine-grit sandpaper (150 or 180) and sanding in the direction of the wood grain. This will ensure that you don’t leave any dents or gouges in your project when you want to remove them.
If you want to go even smoother, consider using an electric power sander (or even just a hand sander with an orbital motion) on your wood filler before applying another coat of paint for a smooth finish.
How do you use wood filler for large gaps?
- For large gaps, you will want to use a putty knife to apply the filler. This can be tricky if you are working on a vertical surface. You want to make sure that you don’t just put the filler on top of the wood and not get it into the gap in between.
- Once you have applied your wood filler, allow it to dry completely before sanding off any excess or rough spots. If you try to sand too soon, then this will remove some of your wood filler and leave bare areas behind where there should be no gaps at all!
Can you paint over DAP wood filler?
It’s best to let it dry for a long time, and then sand it smooth before painting. You’ll want to make sure that the surface is completely clean of any dust or dirt before applying the new finish—something that can take an hour or more depending on how much filler you used and how much sanding needs to be done.
Conclusion
Now that you know how to use DAP premium wood filler, it’s time to get to work! Whether you’re repairing a small hole or filling in cracks, this product will help make your project easier.
Martin Flood
Martin Flood has been working in the construction industry for over 20 years as a general contractor with expertise in remodeling projects that are large or small. He has furthered his career by specializing in epoxy resin flooring, providing excellent service to both commercial and residential clients. Martin’s experience enables him to offer professional advice on how to choose the right type of project based on your needs and budget.
View all posts by Martin Flood →