
Epoxy is a strong adhesive that can be used to seal, fill, and bond various surfaces. It’s also waterproof! In this blog post, we will discuss how to apply epoxy correctly in order to create the best results possible.
What Do You Use To Spread Epoxy
Table of Contents
- What Do You Use To Spread Epoxy
- use a trowel or putty knife to spread epoxy. Some people even use their fingers, but this is not recommended because it’s really messy and you could get resin on your hands! It takes practice to find the best method for applying epoxy.
- How Do You Spread Epoxy Evenly
- Can You Spread Epoxy With A Brush
- How Do You Apply Epoxy Smoothly
- Can I Pour Epoxy Over Epoxy
- Why Is My Resin Not Spreading
- How Do I Prepare My Countertop For Epoxy
- How Thick Can You Pour Epoxy
- Can You Wet Sand Epoxy Resin
- How To Spread Epoxy Floor
- How To Keep Epoxy From Running
- How To Spread Epoxy On Wood
- How To Pour Epoxy Resin Into Molds
use a trowel or putty knife to spread epoxy. Some people even use their fingers, but this is not recommended because it’s really messy and you could get resin on your hands! It takes practice to find the best method for applying epoxy.
How Do You Spread Epoxy Evenly
When using epoxy for a project, ensure that the area is clean and dry.
You also want to remove all of the dust particles from your work surface before applying it.
When you’re ready to start spreading out those layers, make sure there are no bubbles in between them as this will cause some problems later on down the line!
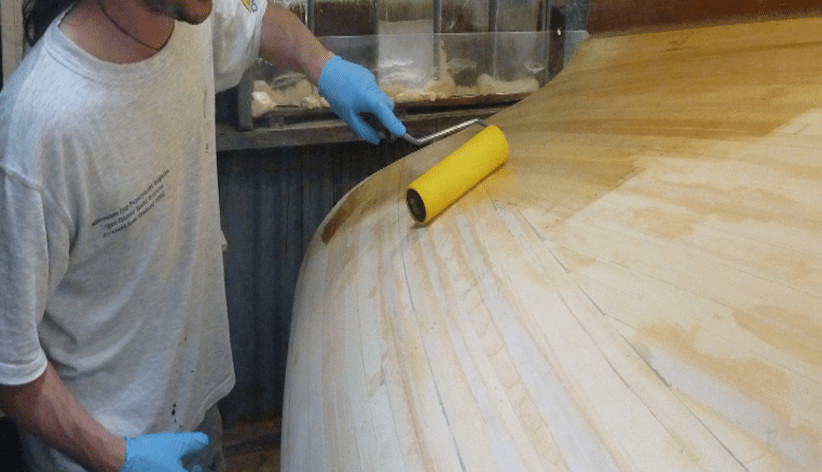
To help prevent bubbles from happening at any point during this process, use an electric roller or brush which has been previously dusted with talcum powder (or corn starch).
This way if there are any air pockets they’ll be easily removed by pushing through these powders into the liquid layer underneath without disturbing it too much.
The last thing we can do here applies more coats than necessary: two should be fine, but three will be even better.
This should ensure that you’ve got a nice thick coat of epoxy covering your work surface so it’s less likely to break or crack, especially if the area is cold which can cause problems with this material.
Can You Spread Epoxy With A Brush
Yes, you can spread epoxy with a brush. You will need to apply several coats in order for the coating to properly stick to your surface and protect it from moisture damage.
Brush on the first coat for at least 18 hours before applying any additional layers of epoxy.
How Do You Apply Epoxy Smoothly
Epoxy is a strong adhesive, so it’s important to have the right technique. There are two ways to apply epoxy: on one layer at a time or with multiple layers of glue simultaneously.
When applying on just one side, let each coat dry for 12 hours before adding another.
If you’re looking to quickly spread out an entire floor covering in under three days, use more than one application method together.
Can I Pour Epoxy Over Epoxy
Epoxy can be mixed with other epoxies, but it’s generally not recommended. The first thing you need to do is determine what type of resin system you have.
You should always make sure that the two parts are compatible before mixing them together. Each brand has different properties and may require specific ratios for proper adhesion or curing time.
Some will mix better than others so experiment if necessary until you find one that works well with your particular situation at hand.
Why Is My Resin Not Spreading
As a beginner, you may have had the experience of mixing resin only to find that it isn’t spreading when you pour it.
This is a common problem for amateurs and professionals alike, but there are some tips that can help alleviate this issue.
How Do I Prepare My Countertop For Epoxy
Spend a little time cleaning and sanding your countertop before you begin. Remove all grease, dirt, grime, and debris from the surface of the wood to ensure that it is evenly coated with epoxy.
Sand down any rough areas or uneven spots so that everything is as smooth as possible for maximum adhesion.
- Wipe off dust using a slightly damp cloth.
- Use 120 grit sandpaper to lightly scrape away any splinters on top of the wood countertops.
- Use 220 grit sandpaper to smooth everything out and remove any residual dirt or dust.
- Wipe down the countertops using a damp cloth once more.
- The cleaner your surface is, the better it will adhere.
- After the area has been cleaned, you are ready to apply epoxy
- Allow at least 20 minutes for your countertops to dry before applying epoxy.
If it is humid outside, wait until there is no moisture in the air (at least 24 hours) and turn on a dehumidifier if possible.
The more humidity present in your workspace, the less effective any kind of sealer or adhesive will be.
You should use multiple layers when applying an epoxy coating, allowing each coat to harden completely between applications can create a longer lasting surface that lasts up to five times as long as single layer application!
How Thick Can You Pour Epoxy
Epoxy thickness is usually proportional to layers of epoxy, which can mean higher viscosity and therefore more difficult application.
You should always pour as thin a layer as possible while still ensuring that the entire bottom stays covered.
Can You Wet Sand Epoxy Resin
Wet sanding with epoxy resin is possible but it isn’t recommended because water and electricity don’t mix very well.
If you must wet sand, use a respirator to prevent breathing in the fumes that are released by the wet sanding process.
It’s also important to keep your work area as cool as possible so that heat doesn’t build up inside during this time period.
In general, there should be no electrical equipment allowed near where you’re working on epoxy until everything has been dried off completely from whatever step just finished being performed, before entering into this stage of the project, since moisture will cause short circuits, or other malfunctions if accidentally brought together with electrical components such as switches or wiring.
How To Spread Epoxy Floor
Epoxy flooring is a popular choice for many homeowners, but you need to know how to spread the epoxy correctly so that it gives good results.
First of all, mix your desired amount of hardener and resin according to the instructions provided by the manufacturer or supplier before using them.
Then apply an even layer onto a clean surface with a paint roller.
Next, wait until it cures completely, and then proceeds to sand down any irregularities in order to smooth out the overall appearance of your new floor if necessary.
How To Keep Epoxy From Running
Spreading epoxy on a vertical surface is easy. The problem comes when you need to cover more horizontal surfaces, such as the floor of your boat or kayak.
If you’re not careful about how and where it’s applied, epoxy can run all over the place.
So here are some tips for keeping this from happening:
Instead of applying straight from the container with a squeegee or putty knife (or even just pouring it out), mix in an equal part by volume of unthickened clear West System 105 Resin and 206 Hardener and apply using a brush before either has started to kick off (harden).
After 15-20 minutes at room temperature, these two products will blend together into one thick coating.
When you need to spread epoxy on a large area, it’s best to use an inexpensive squeegee or paint roller and throw it away when finished.
They’re very cheap, so the cost is not really an issue after all your hard work. Also, using one of these tools will reduce waste because they apply such even coats that there’s almost no run-off at all.
Just make sure you clean them off thoroughly before putting them into storage (besides being bad for the environment), as leaving small amounts of uncured resin on the tool could lead to problems later on if accidentally exposed to moisture in storage.
A final note about equipment:
Be careful around open flames like pilot lights or cigarettes; epoxy contains flammable solvents and vapors.
It also contains isocyanates, which could cause serious respiratory problems if you breathe too much of it in during application or clean-up.
How To Spread Epoxy On Wood
Epoxy is a strong and protective material that can add an extra layer of protection for both indoor and outdoor projects.
It’s different than paint since it will stick to any surface without penetrating or staining the topcoat.
So you don’t have to worry about what the epoxy might be sitting on if using outdoors–just make sure your workspace has been prepped properly!
The only downside:
while epoxies are great at protecting surfaces, they also tend to dry rather slowly making them difficult to spread while still wet enough to take advantage of their adhesive quality.
How To Pour Epoxy Resin Into Molds
You can pour the epoxy into molds to create custom, one-of-a-kind pieces. For this step, you’ll need several disposable containers (such as cups) and sticks of various sizes for stirring.
Mix up your resin according to instructions on package, then use a brush or stick to paint it onto surfaces in whatever pattern you want.
Let dry overnight before removing from mold if necessary, tap edge lightly with a rubber mallet so that adhesive will release its grip on container walls/ bottom.
You may have some leftover resin depending on how many projects are being done at once, store any extra covered in plastic wrap until next use.
This is also an appropriate time to begin cleaning out used dishes/containers since they’re about to be thrown away.
Martin Flood
Martin Flood has been working in the construction industry for over 20 years as a general contractor with expertise in remodeling projects that are large or small. He has furthered his career by specializing in epoxy resin flooring, providing excellent service to both commercial and residential clients. Martin’s experience enables him to offer professional advice on how to choose the right type of project based on your needs and budget.
View all posts by Martin Flood →