
Making keychains out of epoxy resin is a great way to promote your business and get people excited about the product.
This article will teach you how to make keychains, as well as provide some tips for marketing them effectively. Read on to learn more!
How Do You Make Epoxy Keychains
Epoxy resin keychains are easy to make at home. All you need is some epoxy resin, a mold of your choice, and some accessories like glitter or sequins for decoration!
First, make your mold. With resin, you can use anything from a small plastic toy to an intricate rubber stamp.
The best part is that the molds don’t need to be perfect! You can always fix imperfections or add more on top of them later when you’re doing the casting and curing steps.
To begin with, we recommend using one half of a two-part mold, like this:
After you pick out your mold, it’s time to mix up some resin. You can find detailed instructions in our blog post about epoxy resin, but the basic idea is that you measure equal parts of A and B by volume (don’t worry too much about being super precise) and then stir thoroughly until all the little lumps are gone.
When your resin starts getting stringy, thick, or pastelike that means it has begun curing!
At this point, there’s nothing left to do except pour into your prepared mold. And don’t forget safety gear like gloves and goggles while working with any kind of liquid chemical substance!
Resin really isn’t bad stuff at all just be sure to work safely so no one gets hurt.
After your resin has cured, pop it out of the mold, and you are finished! You can use acrylic sealers to protect the surface if you want a glossy finish but aren’t using any glitter or sequins.
Table of Contents
How Do You Make Resin Keychain Stickers
To make resin keychain stickers, follow these easy step-by-step instructions:
Step One.
Gather your materials and tools! You will need a mixing cup with measurements on the side, a stirring stick (or popsicle stick), measuring spoons, an eyedropper or syringe for adding color to the resin mixture if desired, clear epoxy resin, glitter flakes in your choice of colors that you want to add into the mix as well as charms/keychains that you would like to turn into stickers.
Make sure all items are clean and dry before using them so they don’t contaminate the final product! The charm should be small enough so it doesn’t touch any sides when submerged under liquid but large enough where it doesn’t sink to the bottom of your mixing cup.
Step Two.
Measure out equal parts resin and hardener according to the instructions on each bottle. If you are using glitter flakes, measure out a small spoonful or two for every ounce of resin.
Using too little will make it difficult to coat all sides with glitter! Stir in any desired colorants at this time.
remember that coloring darkens as it dries so not adding tint now can result in lighter colors later on when you set these stickers into place!
NOTE: since some epoxy resins have metal shavings/pieces included within their contents, be sure they don’t touch the charms before use!
Step three.
Keep stirring until all ingredients are mixed together. Make sure there are no clumps!
Step Four.
Add in the charm and wait for it to fully coat and harden (usually around 20 minutes) before moving on to step five.
If you want a thicker coating, add more glitter or resin while waiting!
After applying baking soda, don’t forget to rinse with water until all of the residues are gone otherwise, soap will not be able to wash away properly!!
Last but not least: ALWAYS wear gloves when working with epoxy resins they can irritate skin if left uncovered!
Can You Make Keychains With Resin
Yes, you can make resin keychains. The process is very much like when making other resin objects such as paperweights and vases except that the keychain shape will need to be planed out in advance before beginning.
Why Are My Resin Keychains Cracking
There are many reasons why epoxy resin keychains may be cracking. If you’re not careful, it can ruin your design and look unprofessional. Here is a list of the most common causes:
Poor Design:
If your design does not have enough resin to fill the mold, there will be gaps. These areas are weak and cause cracks when you try to get them out of the molds. Don’t forget that some designs may need more than one pour of resin.
Not Enough Mixing:
Make sure you’re mixing correctly! You want it thoroughly mixed so all bubbles rise to the top before starting to cast epoxy resin keychains into a mold especially if they contain metal elements like charms or chains.
Resin can also form bubbles during cooling after being poured in molds for epoxy resin keychains because its chemical reactions release gas at this stage; these tiny bubbles aren’t harmful but do breakthrough your epoxy resin keychains’ surface.
Not Enough Ventilation:
Your epoxy resins need to be able to vent properly or else they will release excess gas that creates bubbles and in turn, cracks in the finished product.
Make sure your room is well ventilated before you begin working with it if you’re planning on making a lot of epoxy resin keychains because this chemical has strong fumes when mixed together so proper ventilation reduces chances for illness caused by inhaling toxic chemicals.
That’s why many people choose to wear safety masks during casting processes!
Too Much Heat/Cold:
The resin becomes more sensitive when exposed to high temperatures, especially hot water used for cleaning metal elements like keys. It can ruin its integrity leading to cracks and other problems.
Improper Storage:
Make sure your epoxy resin keychains are not exposed to direct sunlight, extreme cold/heat, or moisture as this can cause them to crack quickly.
Instead, keep them in a cool dry place for extended storage if they’re meant for long-term use like creating jewelry with our charms!
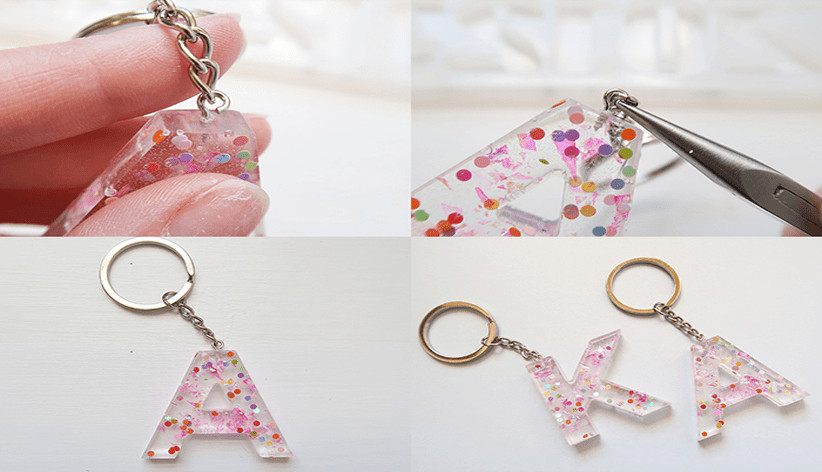
How Do You Make Resin Alphabet
With this method, you can make resin alphabet that is colorful and unique.
Resin jewelry is becoming more popular, especially with the rise of DIY projects online.
Making your own resin keychain or pendant is an easy way to upcycle old items into something new! Resin has many other uses as well so let’s get started on how to make epoxy resin keychains!
Can You Put Paper In Resin
Yes, you can use paper with resin. However, while it will be protected from the elements by the resin, the paper itself is not very strong and will deteriorate over time.
In addition to this, some papers contain chemicals that may interact badly with your epoxy resin.
How Do I Add A Name To Resin
Adding names is not difficult, but it’s important to make sure that your name or design fits within the space on the resin. You may want to try out a few different designs before you craft them into keychains and test their fit in front of a mirror!
To add text: Make an outline with a permanent marker onto your finished epoxy resin piece where you want your name.
Cut it out with an X-Acto knife so that the edge of the lettering is clear all around, but do not cut through to the resin surface itself.
Sand or file away any sharp edges on your keychain before using or giving it as a gift!
How Do You Put Pictures On Resin
To put a picture on resin, you will need an image printed of your choice onto transparency paper using an inkjet printer.
If the print is not small enough or if it’s too detailed, then you can use photo editing software to crop and resize it before printing again. Or simply order a smaller image.
How Do You Dry Resin Keychains
There are a few different ways to dry resin keychains. One of the easiest options is putting them in front of a fan overnight.
This works best with small pieces that have flat backs, like pendants or charms.
On larger items, you can use an oven set on low heat for around five minutes, but be sure to check often so they don’t melt.
For resin earrings, you can use a heating pad set to low heat for about 15 minutes or until the keychains are completely dry.
Martin Flood
Martin Flood has been working in the construction industry for over 20 years as a general contractor with expertise in remodeling projects that are large or small. He has furthered his career by specializing in epoxy resin flooring, providing excellent service to both commercial and residential clients. Martin’s experience enables him to offer professional advice on how to choose the right type of project based on your needs and budget.
View all posts by Martin Flood →