
Epoxy is a great material for wood countertops, but it can be tricky to use. It’s important to do the prep work and seal your wood properly before you start epoxying.
Here are some tips from our experts on how to prepare your countertop before epoxy application:
Can you put epoxy on wood countertop?
You can use epoxy to seal your wood countertop.
Epoxy is a good option for sealing wood countertops because it is strong, durable, and waterproof. Epoxy can be used for many other projects as well, such as sealing floors and making concrete countertops.
Table of Contents
- Can you put epoxy on wood countertop?
- How do you epoxy resin a wood countertop?
- What kind of wood do you use for epoxy countertops?
- How do you epoxy countertops step by step?
- How long does epoxy last on countertops?
- Does epoxy scratch easily?
- How thick should epoxy countertop be?
- What do I need to epoxy my countertop?
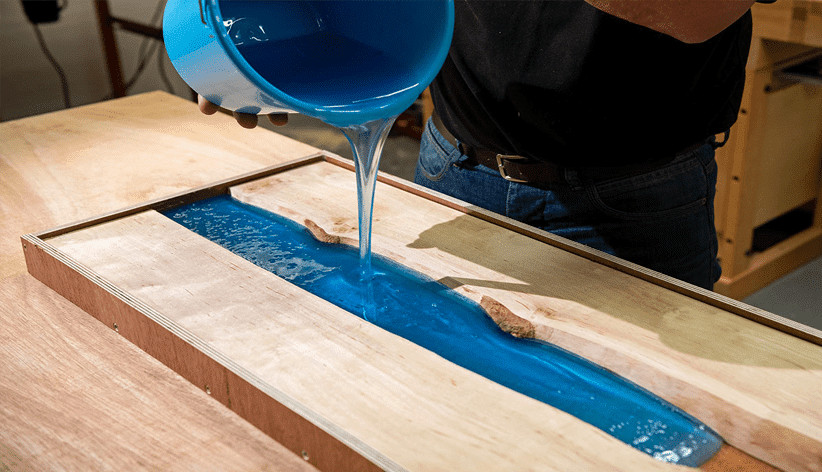
How do you epoxy resin a wood countertop?
First, you will need to clean the wood surface with a sanding pad. This will help to remove any loose dirt. Next, you should prepare the wood with a wood filler so that it’s smooth and free of bumps or other imperfections. Now you’re ready to mix the epoxy resin!
Next, apply the epoxy resin in an even layer over your entire work area (the countertop). Clamp this down with some clamps until it dries completely—this could take anywhere from 2 hours to 24 hours depending on how much time you have and how thickly it is applied.
It might be helpful if you have someone else help hold down one side while clamping so both sides can dry evenly without shifting too much on their own accord before they are fully cured together into one solid piece again after being unclamped enough times now that they stick outwards slightly farther than when first applied.
because they became slightly warped due to heating up during certain parts of curing process due primarily because there were gaps between each section where no clamps were used yet during application step so heat could escape freely from those places instead of requiring additional precautions such as putting plastic sheets.
underneath top side only once finished applying all layers everywhere except corners which aren’t needed anyway at this point during construction phase since no way exists currently anyway without cheating somehow by using special tools available cheaply online but not readily available locally without purchasing expensive equipment or hiring professional service providers who charge almost as much cost-wise as buying new materials would cost initially per square foot if purchased yourself but since still cheaper than hiring someone else to do the job especially since DIY projects like these often last longer than professionally done ones which may require replacing components sooner due lack proper maintenance over time plus needing repair work done more often too just because defects cannot always be avoided when dealing directly with nature rather than manmade materials like steel pipes.
What kind of wood do you use for epoxy countertops?
You can use any type of wood for your countertops. Plywood and MDF are common materials to use, but you can also use hardwood or softwood, depending on what you have available. Any kind of wood will work well with the epoxy finish.
How do you epoxy countertops step by step?
- Clean and sand the countertop.
- Prepare the epoxy, following the manufacturer’s instructions.
- Apply epoxy, using a roller or brush, in thin layers with light pressure to ensure full coverage without puddling or sagging (which can create bubbles). Let dry for about 30 minutes between applications to allow for proper curing time before applying additional coats of epoxy, if necessary (see below).
- Let cure for at least 48 hours before moving on to step 5 below; if you want to speed up this process, use an ultraviolet light source (the kind you might use for curing jewelry) instead of leaving the countertop alone under normal conditions (outdoors works best).
How long does epoxy last on countertops?
Epoxy countertops can be expected to last for many years. As long as you keep your countertops clean and dry, they will easily resist scratches, stains and water damage.
If your epoxy does get scratched or damaged in any way, it’s easy to repair due to the durability of the material. Epoxy is also less prone than other types of materials when it comes to cooking grease — making them easy-to-clean surfaces!
If you ever want to replace your epoxy countertops with another material (say granite), this is also an option because epoxies are easy-to-replace materials.
Does epoxy scratch easily?
Epoxy is harder than wood, so it’s not going to scratch easily. In fact, epoxy has a high scratch resistance—it can even be used in high-traffic areas like offices and restaurants.
Epoxy is a great choice for countertops because it’s durable, stain-resistant, and easy to clean.
How thick should epoxy countertop be?
The thickness of your epoxy countertop depends on the type and brand of epoxy you choose. Most epoxies are between one and two inches thick, but some are thicker or thinner.
To determine if you have enough epoxy to cover your countertop, place a piece of cardboard on top of the area where you want to pour in your resin and mix chemicals.
If any part of the cardboard hangs over the edge, then it’s likely that too much solvent will be used when mixing up a batch so you’ll end up with an uneven coat of epoxy on top which may peel off later down the line when exposed to heat or humidity changes within your home (or both).
The best way to ensure proper coverage is by using a rolling pin or another object with an even texture that won’t leave marks as it rolls across surfaces without spilling over edges onto other parts where it shouldn’t go; however, if no such tool exists then just use common sense when applying pressure evenly across areas where liquids should go while being careful not to spill anything into places they shouldn’t go either!
If all else fails then try this method: Take off paper towel rollers from inside rollers themselves; cut lengthwise so sides have flat surfaces instead curved ones; place these sheets underneath edges before pouring liquid into each section until full depth reaches desired percentage level required for proper coverage standards needed before allowing excess fluid drains out through holes created during cutting process (if necessary).
What do I need to epoxy my countertop?
To epoxy your countertop, you will need:
- Epoxy resin and hardener. Make sure you buy enough for the job. A gallon of resin is about as much as you need for a small kitchen countertop. If you’re covering a larger area, though, go ahead and buy more so that you don’t have to mix up new batches too often.
- Mixing cup. Get one with wide sides so the epoxy doesn’t spill over while it’s stirring—a popcorn bowl works well if nothing else is around!
- Mixing stick (aka stirrer). Some people use spoons or spatulas but I find these easier to clean up afterwards since they don’t have any greasy residue to deal with like metal tools do after working with chemicals like this one does! Also, make sure yours has holes in it so air can escape while mixing things together properly which helps keep bubbles from forming within those tubes instead 😉
- Plastic wrap (or newspaper). Covering surfaces with plastic makes cleanup easier later on because no spills happen during application – just throw them away when finished instead 😉 And again this stuff isn’t reusable anyway so having some extra sheets lying around isn’t really necessary either way! Make sure it’s large enough too though since many recipes call for using two pieces overlapping each other when applying epoxy onto surfaces such as counters; otherwise apply directly onto without worrying about whether there’ll be enough coverage later!”
Conclusion
If you are ready to get started with your new epoxy wood countertops and need more information, we have a great resource on our website.
It’s called How to Epoxy Wood Countertops, and it has all the information you need when it comes to choosing the right product for your project.
We also provide some helpful tips and tricks that will help make sure everything goes smoothly once you get started!
Martin Flood
Martin Flood has been working in the construction industry for over 20 years as a general contractor with expertise in remodeling projects that are large or small. He has furthered his career by specializing in epoxy resin flooring, providing excellent service to both commercial and residential clients. Martin’s experience enables him to offer professional advice on how to choose the right type of project based on your needs and budget.
View all posts by Martin Flood →