
epoxy grout is a great way to add color and texture to your shower floor. It’s also easy to apply and can be removed if you decide it’s not right for your bathroom. Follow these steps for a beautiful epoxy finish:
1. clean the floor
Once the floor is dry, you’ll need to prepare the surface for epoxy grout. First, vacuum or sweep away any dust and debris from your shower floor.
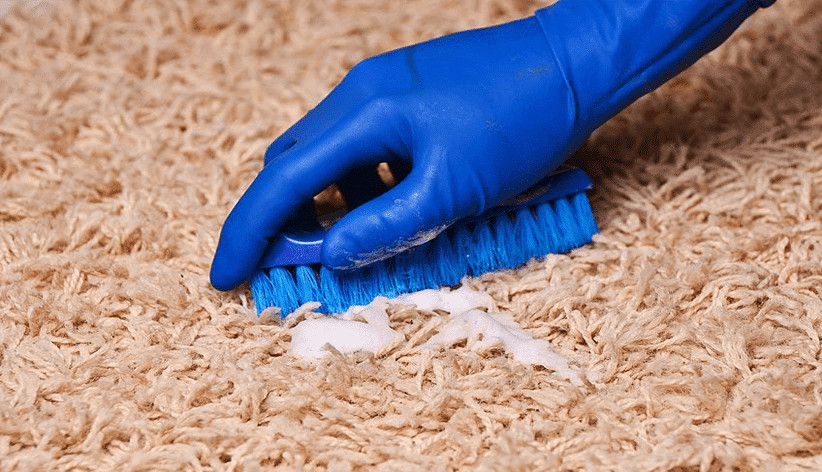
Then, clean it with either a damp cloth or a dry cloth. If your bathroom has hard water deposits or soap scum on the tiles’ surfaces, you should use a scrub brush (with bristles) to get rid of these deposits before applying epoxy grout.
Table of Contents
2. mix the grout
Mix the grout. Use a grout float to mix the grout, which should be the consistency of yogurt. Add water to thin it down and spread it with your fingers if you want a thinner application.
Apply the grout to the joints between tiles and then use a grout float (a long-handled tool with an oval-shaped head) to remove excess.
You’ll have plenty of time before this dries, so take your time and try not to worry too much about getting every last bit out!
3. apply the grout
Now you’re ready to apply the grout. This is not as difficult as it seems, and I promise a lot of fun!
There are many tools that may be used for applying grout. The most common are:
- A grout float
- A grout sponge
- A grout bag
- A grout gun (these are very different than the epoxy applicator guns that we use for polyurethane)
- A pump or spreader
4. remove excess grout
Once you have allowed for sufficient drying time, remove excess grout from the joints using one of the following methods:
- Use a grout float to push excess grout into the joints and off of the floor surface.
- Use a dampened grout sponge to wipe up excess grout away from the edges of each tile, taking care not to disturb them (they must remain in place during drying).
- Use a dampened cloth or towel to wipe away any remaining loose epoxy-based sealer or adhesive residue from around your tiles’ edges and corners (you should have done this earlier on with an eraser).
5. apply neutral cure silicone sealant
Once you’ve applied your grout, use a trowel to spread neutral cure silicone sealant onto the joints. Leave this to cure for 24 hours before moving on to the next step.
When you’re ready to clean up after applying your sealant, use a damp cloth and wipe off as much of it as possible.
You may have some leftover residue that can be removed with soap and water later on if necessary, but remembers not to get any in your eyes or mouth!
6. remove access silicone sealant
You can use a sponge and water to remove the excess silicone.
It’s also important that you clean up any areas where there is a silicone that has gotten stuck to your tiles or grout by using a razor blade or scraper tool.
7. clean the joints
- Use a sponge and water to clean the joints.
- Use a toothbrush to clean the joints.
- Vacuum the joints with a wet/dry vacuum cleaner, or use a scrubbing pad to remove excess grout from the joints and then vacuum again with water pressure behind it (you can also use an air compressor).
- Scrub any remaining excess grout out using one of these methods: * A grout brush or other stiff-bristled brush; * A grout sponge (available in most home improvement stores)
8. mix urethane grout additive
Now it’s time to mix the grout additive with the grout. Add one part of the additive to two parts of grout and stir thoroughly.
The ratio of 1:2 is a typical proportion, but it may vary depending on how thick you like your application.
If you have a more viscous product than what we’ve recommended for this tutorial, then use less additive; if you have a thinner product, then use more additive.
9. apply urethane grout additive
Once you’ve applied the epoxy grout, you’ll want to apply an additional coat of urethane grout additive. Urethane is a polymer that will make your grout more durable, waterproof, and resistant to stains.
It’s easy to use: just stir it up in some water and pour it into the joints between the tiles by hand or with a brush.
10. finish and enjoy
- Wash the floor with a water-based cleaner and let it dry.
- Clear any excess grout from joints with a damp cloth and let them dry.
- Give the floor one final cleaning with a dry cloth to remove any dust or debris that may have settled on the surface during drying.
- Let your newly installed epoxy grout shower floor dry for 24 hours before using it! After this time, you’re free to mop your new grout as needed (but not too often—every two weeks should do). When you’re done mopping, wipe down your shower stall with warm water and mild dish soap or cleanser, and then air-dry it so you can keep enjoying your beautiful new look all year long!
Conclusion
Having a shower floor that’s easy to clean and looks great can be easy to achieve with the right product.
You don’t need to be an expert to apply epoxy grout, but you do need some basic knowledge of what makes it work so well!
Martin Flood
Martin Flood has been working in the construction industry for over 20 years as a general contractor with expertise in remodeling projects that are large or small. He has furthered his career by specializing in epoxy resin flooring, providing excellent service to both commercial and residential clients. Martin’s experience enables him to offer professional advice on how to choose the right type of project based on your needs and budget.
View all posts by Martin Flood →