
To get your project looking its best, you’ll want to fix dimples before the epoxy is cured. Be aware that applying heat to remove a dimple will cause the epoxy to cure faster and could affect your final finish.
To prevent an excessive amount of curing, only apply heat for about two or three seconds at a time.
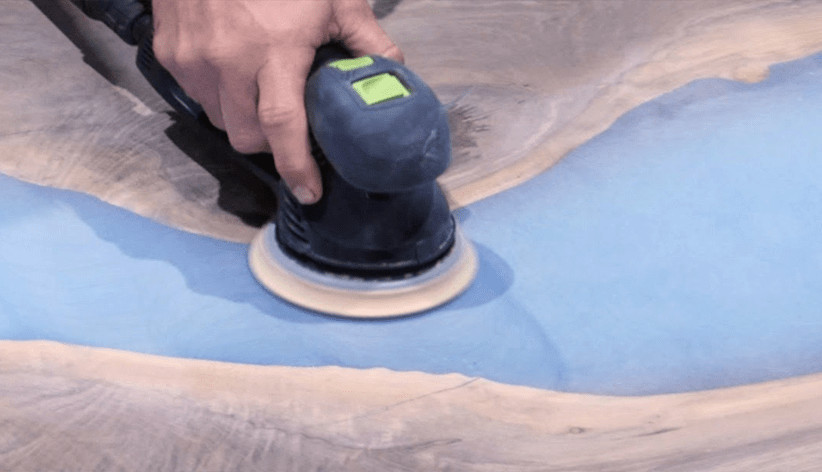
If your resin has already cured, you can still fill in any dimples if you don’t mind some additional texture on the surface. Simply sand off the dimple and fill it with more epoxy resin and then sand smooth when it cures.
How do you fix epoxy dimples?
Thankfully, fixing a dimple is easy. Dimples are often trapped bubbles that remain after the epoxy cures. You’ll want to use a heat gun—a hot air gun or propane torch will work as well—to get the residual gas to rise out of your live edge slab.
Table of Contents
How do you fix epoxy craters?
It’s not a pretty sight, and you’d expect that epoxy resins used in home repairs would offer solutions to problems like this. But I discovered that the ‘deeper’ the crater, the harder it is to fill it back in.
I didn’t have much luck with glue and putty, so I started trying out epoxies with different ratios of filler solvent to resin. For the second go-around, I used 20% resin and 80% solvent.
It was less running, but oddly enough it wasn’t as easy to smooth out over time—then again, in this case, I had more control over its shape.
The next day found myself repeating the process with a 30% resin/70% solvent mixture. Finally got it right by using a 40% resin/60% solvent ratio and getting rid of any trapped air bubbles by using a heat gun on the surface all at once—this gave me a nice even finish that would be easily sandable without rounding off edges or causing any other problems.
Why does my epoxy resin have dimples?
Dimples often appear in a casted epoxy resin piece when the epoxy cures in a humid environment. As the epoxy cures, it does so from the top down and moisture evaporates through the top surface, causing dimples to form in the piece.
How do you fix epoxy resin mistakes?
If you have a small dimple and don’t have time to sand down the epoxy and start over, you can try the following:
- Sand down the surface of the dimple until it is even with the rest of your project.
- Mix up a little more epoxy and fill in the sanded area.
- Use one of these methods to remove air bubbles from your project: torch, heat gun, vacuum chamber or paintbrush method.
How do you fix bumps on resin?
Well, I can tell you a few tricks to try (at least the ones I learned from the Internet).
The epoxy I have is an industrial strength resin that doesn’t come in any direction. If you Google it and click on “fix epoxy” or “fixing epoxy bump,” then it should lead you right to the next part of this tutorial.
The first thing we’re going to do is use a heat gun. On my last job, I was repairing a tabletop by cutting out the piece that had been cracked.
As soon as I finished cutting out the damaged wood, there was this big nasty bump on the surface of the new piece so that instantly ruined it for me.
You can’t sand through that stuff without removing all your hard work, so what we’re going to do is apply some liquid steel straight to those corners and then let it cure overnight. The repair turned out just fine and even actually made the original piece look better!
How do you fix a hole in a resin?
If you have a hole in your resin, the good news is that it’s an easy fix. Just pour more resin over the top! The key is to ensure that the resin is level and won’t create a new large dimple or hole.
If this happens then you will need to sand back and repeat until there are no holes or dimples.
How do you fill epoxy holes?
First, fill the hole with a small amount of resin using a wooden toothpick or a stir stick.
Then, let it dry for about 24 hours.
Once the epoxy is fully cured and hardened, you can sand it down so that it’s flush with the rest of the wood.
Why is my epoxy bumpy?
While some beginners are not concerned with how their resin is curing and start applying it to their projects as soon as they feel a bit of pinhole, many hobbyists want the perfect epoxy resin.
This is especially true for those who want a smooth and perfect surface finish. The easiest way to cure epoxy resin is to leave it at room temperature for 24 hours before you apply it.
Even if you don’t have a good chemistry set, or know how to dissolve your project properly, there’s no need to worry. You can learn how to do this easily- just follow these simple steps.
Conclusion
By following these tips, you’ll be able to achieve a smooth finish with your epoxy resin.
There are a lot of variables that can cause dimples in your resin, but the best way to avoid them is by being patient and letting the resin cure slowly.
If you’re interested in learning more about epoxy resin and other ways to use it, check out this website for more information.
Martin Flood
Martin Flood has been working in the construction industry for over 20 years as a general contractor with expertise in remodeling projects that are large or small. He has furthered his career by specializing in epoxy resin flooring, providing excellent service to both commercial and residential clients. Martin’s experience enables him to offer professional advice on how to choose the right type of project based on your needs and budget.
View all posts by Martin Flood →