

Epoxy floors are a great way to protect concrete and secure it for heavy-duty use. They’re durable, easy to clean, and can be designed in limitless ways.
While most people know that it’s possible to have a professional install an epoxy floor, fewer know that you can also do it yourself.
If you have a concrete floor in your garage or workshop, or if you want epoxy on your basement flooring, here’s what you need to know before making your own epoxy floor.
How do I make my own epoxy concrete floor?

Remove the existing flooring and clean the surface thoroughly
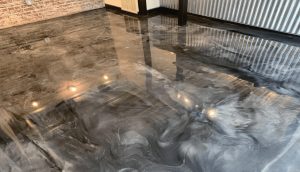
Epoxy flooring is considered to be one of the best choices for garage flooring. It’s a durable, low-maintenance and easy-to-clean option that’s more affordable than other types of flooring. Epoxy floors also come in a variety of colors and textures.
You can either hire a professional to install your epoxy floor or do it yourself. This article covers how to make your own epoxy concrete floor using an epoxy kit purchased from a hardware store or online retailer such as Amazon. If you want something more advanced, there are companies that offer custom-made kits with their own installation instructions (and sometimes even videos).
If you don’t already have an old tile or vinyl that needs replacing on your garage floor, then you’ll need to purchase some new tiles before starting this project so they match what’s already there – unless you’re going for something completely different!
Table of Contents
How do you make homemade resin flooring?
Making your own homemade epoxy floor is a breeze. Follow these steps to make your own seamless, durable, and glossy epoxy floor:
- Start by thoroughly cleaning the surface with a vacuum or broom.
- Apply degreaser to the floor and scrub with a stiff brush or sponge to remove stubborn stains and grease.
- Rinse the area with clean, clear water and allow the surface to dry completely before moving on, which can take up to 24 hours depending on the type of substrate you’re working with (concrete should be completely dry). Drying times may vary so always check manufacturer instructions for details about drying times for your specific product prior to application – some products require additional drying time after sanding has been completed.
- To prepare for epoxy application, you will need to rough up your old concrete floor using an orbital sander; this helps ensure that the coating will stick properly when it’s applied later in this process! A good rule of thumb is about one square foot per minute at 150 RPMs if possible; start slowly because too much pressure can cause damage from excess friction heat buildup due to high speed rotation speeds or torque forces acting upon them while being used improperly.”
What are the materials used for epoxy flooring?

The materials for an epoxy floor are:
- Epoxy resin and hardener – these two substances react to create the actual floor. Most times, these substances come in a kit that you have to mix together.
- Colorant – this is what gives the floor its color. You will need to pick a color beforehand so that you can add it to the mixture before pouring it onto your concrete base.
- Wood sealant – if you’re going to be installing your epoxy floor on top of wood, then you will need a wood sealant as well.
- Concrete sealant – similarly, concrete needs a concrete sealant. This helps protect it from humidity and moisture, things which can ruin any type of flooring
How much does DIY epoxy cost?
The average cost for a DIY epoxy floor is about $4 to $9 per square foot. The price you’ll pay will vary depending on how much of the project you can do yourself, and what kind of surface you’re coating.
Coating an existing concrete floor that’s already in good shape will be cheaper than filling cracks and sanding a rough slab. It’ll also be cheaper to install epoxy on the floor of your garage, which may already be well-prepared, than on an unfinished basement floor that needs work before it can receive the coating.
You may need more materials if your concrete has cracks or pits, needs patching, or requires new paint or primer coatings. These additional materials will make your project more expensive.
Is DIY epoxy easy?
No, not really. If you do it yourself, you’re probably going to be applying your epoxy in a way that will result in the following:
- Bubbles. Bubbles are likely to form during your epoxy application because of air stirring up from the mixing process. Air pockets can also form due to improper application techniques or an insufficiently clean surface.
- Uneven thickness. An uneven application means an uneven floor, which may not seem like a big deal until chunks begin falling off and causing tripping hazards. Thinner areas will wear more quickly, leaving gaps that are ugly and could potentially lead to vehicle damage and tire punctures.
- Stains, odors, and other contaminants that can’t be cleaned up after the fact
Epoxy is made out of several different components (epoxide resin, polyamine hardener) that all need to be measured carefully and mixed together in proper proportions before being applied evenly over a clean and appropriately prepared surface (acid etching).
The resulting mixture needs consistent temperature control throughout installation; if it cools down too much it might start forming clumps before you get the chance to apply it evenly on your flooring and enough time for curing should be built into your schedule (usually 24-48 hours). In short: there’s a lot involved with DIY epoxy coatings compared with other kinds of DIY projects around the house.
Can you DIY Epoxy garage floor?
Absolutely! These products are designed to be user-friendly and easy to apply. The manufacturer’s instructions need to be followed closely, however, because the entire process is a science.
You can find many instructional videos on Youtube for most epoxy manufacturers that can further assist you in making an informed decision.
What is the difference between epoxy and resin flooring?
Epoxy is a type of resin and is often used in flooring. Resin flooring refers to a coat or overlay that goes on top of an existing concrete surface.
An epoxy, which is a material that binds other materials together, is used as part of the process for creating resin floors. Epoxy is usually used in its liquid form but can also be cured into a solid state when exposed to heat or ultraviolet rays.
The process for creating an epoxy floor includes multiple steps such as cleaning the concrete, patching up any holes or cracks, and then pouring on the epoxy coating and finishing it with color chips.
Can you epoxy a kitchen floor?
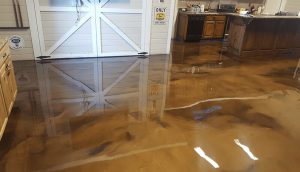
So, can you epoxy a kitchen floor? Yes. Flooring for kitchens is exposed to a lot of wear and tear, so hard-wearing materials like epoxy are the best option. Epoxy is stain resistant and easy to clean—perfect for everyday use in the kitchen. Plus, it’s super durable and can even be used to cover damaged floors, giving them a whole new lease on life.
However, if your kitchen has an uneven floor that needs leveling first, epoxy may not be the best choice. This also applies if you want underfloor heating or there are damp problems with your subfloor: these are tricky conditions that could cause issues with most resin flooring systems (although some self-leveling epoxies may work).
Conclusion
You now have the skills and knowledge needed to create epoxy flooring for your garage, basement, or other areas of your home. Epoxy flooring is a great way to save money while giving your space a modern look.
Martin Flood
Martin Flood has been working in the construction industry for over 20 years as a general contractor with expertise in remodeling projects that are large or small. He has furthered his career by specializing in epoxy resin flooring, providing excellent service to both commercial and residential clients. Martin’s experience enables him to offer professional advice on how to choose the right type of project based on your needs and budget.
View all posts by Martin Flood →